Phones are our go-to for everything. Whether it's a quick call or email, we can't live without them. But who hasn't felt the frustration of picking up your phone from the couch because it's charging on the floor behind the sofa? The simple solution is to create a charging station that organizes all of your loose cords and wires. That's why we've gathered some of our favorite DIY Phone Charging Station Ideas from around the web! Whether you're looking for something to hold your phone and tablet or something to hold all your devices, we have you covered.
DIY Phone Charging Station Ideas
We all know the importance of having a charging station in our homes. But how many times have you thought about having a useful charging station? Managing your devices can be a hassle when you have limited outlets at home and work. But with these DIY charging ideas, you can keep your tech gadgets organized and nearby while they are in use—so they'll always be fully charged and ready when you need them. There are many different ways to make your DIY charging station, whether for your phone, tablet, or other devices. These ideas are easy to craft, and everyone can make a nice addition to your home décor.
Phone Charging Station From Picture Frame
Create a smart, stylish and functional wall charging station that holds your phone while you’re cooking or doing the dishes. Replace the back of an ordinary picture frame, fit a sheet of thick card in it and cut holes for your charging cords on both sides. Our range of frames is simple to drill through, and no special tools are required. This project is budget-friendly and simple enough for anyone to do – even if you don’t consider yourself crafty! You can easily store and charge multiple devices and organize and charge your cables with this simple-to-build DIY hack.
Turn Books Into A Phone Charging Station

Turn that unused stack of books you have lying around the house into a phone charging station. With this tutorial, you'll be able to create a neat and organized spot for your device to rest while plugged in. Start with books you no longer need and trace your device's shape to mark where you'd like it to rest while charging.
DIY Multiple Device Charging Station
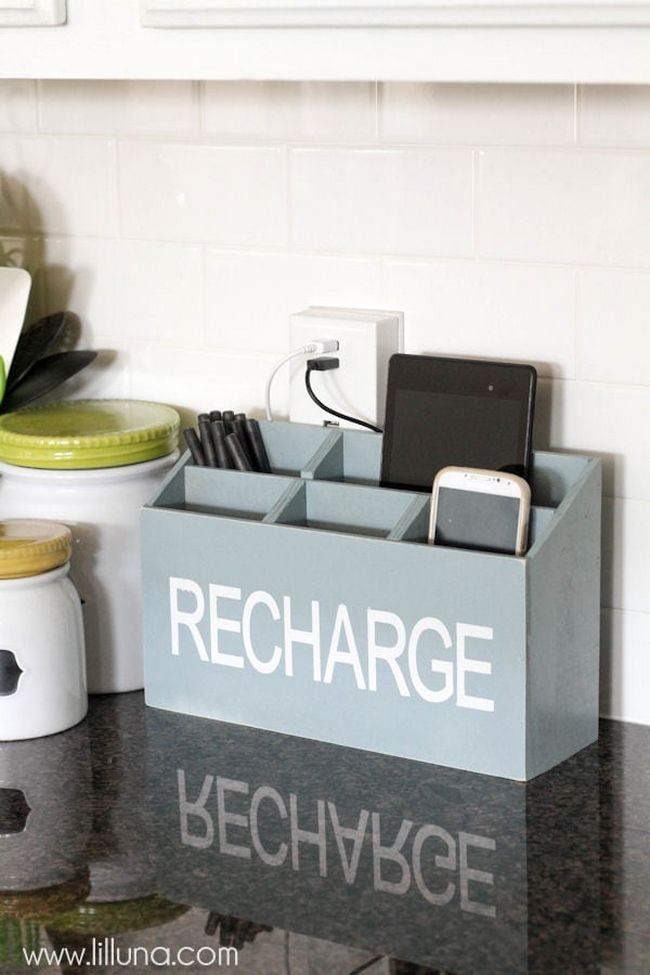
If you want to make an ultimate charging station at an affordable cost, then this DIY project will help you. The main focus of the DIY Multiple device charging stations is to reduce the mess and make it more organized while they are charging their mobile devices. A box has been created using wooden pieces with a divider inserted between them so that people can put/her mobile in one of the six pockets. This way, every family member can keep their mobile or tablet inside their pockets and make it easier for them to grab back when needed.
Repurpose Utility Cart Into Charging Station
Utility carts are multipurpose, flexible, and can be used in many different areas of your home or office. Take one of these low-cost pieces of furniture and repurpose it into a functional charging station that allows you to keep the cords out of sight and all your electronic devices powered up. This easy DIY project is great for keeping wires hidden, electronics organized, and your space neat. All you need is a small utility cart and a power strip. Add in some cable and zip ties, and you’re well on your way to a functional charging station that looks good in any room.
Family Charging Station
This DIY charging station is a must-have for any spouse looking to stop cable clutter and keep the peace. Make this project easy by laying out your devices and placing the cord lengths into position before you start cutting. To ensure that the charger connection will fit correctly, ensure that the outlets are aligned and do not overlap. The dual-outlet tabletop unit provides two USB ports for charging tablets, smartphones, and other mobile devices. It has a sleek, modern design that blends in with your décor.
Transform Desk Organizer Into Charging Station
A desk organizer is a versatile and convenient way to keep your favorite devices ready. Still, with this project, you can transform it into a charging station that fits beautifully with your home decor. Accommodate your phone and tablet by creating a charging station at your desk. First, drill holes in the desk organizer for the USB cables. Then, paint or decorate the desk organizer how you find it suitable. Next, attach the charger to the spot you identified earlier using Velcro. Once you've done all this, insert your phone or tablet, plug it in, and charge away!
Wooden Charging Station
This wooden charging station is perfect for adding rustic vibes to your home office or charging area. The box has a beautiful wood grain and a brass hinge, which adds to the rustic aesthetic. A wooden box serves as the base, allowing you to drill holes for your cords and power strip in the back and along the sides for easy access. This wooden charging station will hold all your devices, including cords and adapters, in one sturdy place. This piece also serves as a convenient place to store your devices while they charge.
Family Charging Station Ideas
If you've got multiple connected devices in your household, you can quickly eliminate this mess by turning a shoebox into a charging dock for the entire family! The family charging station is a great way to keep your devices organized and in one place, but what if you need a charging dock for multiple family members? Try turning a shoebox into a charging hub for the entire family. Cut out holes for USB cables on the front and another hole on the lower corner of one end of the shoebox for your power strip cable. Add decorations, and it's good to go.
DIY Phone Charger Letter Tray
Add functionality to your desk with a phone charger letter tray. This DIY phone charger letter tray transforms your desk space into a charging station. Perfect for the home or office, a letter tray provides a simple way to charge several devices simultaneously. The best thing about this solution is that it’s easy to make, rugged enough for daily use, and doesn’t cost much. Attach strips of wood or cork (you can use a washer to create grooves on the back), then attach binder clips using Gorilla Glue or wood glue to keep cords in place.
How To Make Charging Station From Repurpose Breadbox
Do you want to hide all of your charging cables or have them visible? Are you using these for larger devices like laptops and tablets, or do you only need power for smaller items? Then this idea will hit best for you. You can transform an old breadbox into a charging station for all your devices. The sturdy and well-insulated box will keep cords organized and power flowing to multiple devices simultaneously—drill holes for the cords that need to be plugged in. You can drill more than one hole if you have both power cords and cables from cell phones and other mobile devices that need to be charged.
Vintage Charging Station
Create an outdated charging station that's filled with retro vibes and retro device chargers. Its vintage hatbox shape adds a unique touch to your home office or workspace while keeping your smartphones and tablets organized and charged. Start by painting the hatbox with a color you love. Then, drill holes in the bottom and top of the hatbox. Next, add eyelets on the bottom side of each hole to bring things together. You can mount one end of the surge protector to a wall (secure) and then run the other end through an eyelet for security. And it's that easy!
You can also see: DIY Solar panel plans to get electricity anywhere anytime
Leave a comment