Making beautiful crochet orchids is really fun! In our guide, we share easy patterns with you. These Crochet Orchid Patterns will help you create your own pretty orchids that can brighten up any space. We've made sure to pick the simplest patterns, so even if you're just starting, you can follow along and enjoy. Our list of orchid patterns is like a treasure map to making elegant flowers and help you making wonderful additions to your crochet collection together!
Free Crochet Pattern For Orchids
Crochet Orchid Flower In Pinkish Shade
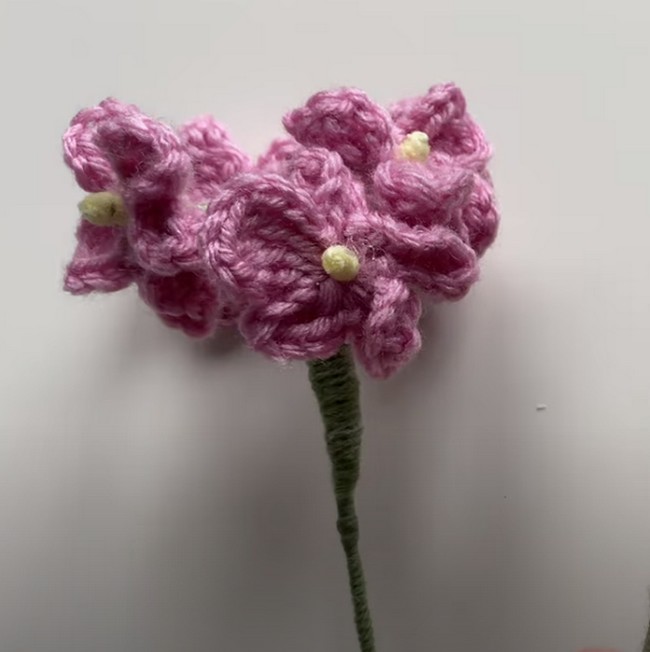
Create a delicate crochet orchid with a few simple materials, perfect for adding a touch of nature to your decor or crafting a handmade bouquet. These quick-to-make flowers are crafted using a magical circle technique, with each petal worked individually and then assembled to bring the orchid to life. The wire stem offers flexibility for arranging in a vase or adding to a floral display.
Materials Needed:
- 3 different colors of weight 4 yarn (pink for petals, green and yellow for the stem)
- 3.75 mm crochet hook
- Tacky glue or hot glue
- Wire cutters
- Crafting scissors
- 18 gauge floral wire
Abbreviations Used:
- ch: chain
- tr: triple crochet
- sl st: slip stitch
- mm: millimeter
- gauge: the thickness of the wire
Making Process:
- Begin by creating a magic circle with the pink yarn using your 3.75 mm crochet hook, secure with a ch 1.
- Inside the circle, ch 4 for the base of the petal, then work a tr (triple crochet), wrapping the yarn twice around the hook.
- Add another tr into the magic circle.
- Ch 4 again and close the petal with a sl st into the circle.
- Repeat this process to make four more petals, for a total of five.
- After the last petal, cut the yarn, pull through to fasten off, and snugly close the magic circle leaving a small gap.
- Prepare the stem by cutting a length of 18 gauge floral wire. For a long stem, leave one wire uncut. For multiple shorter stems, cut several shorter pieces.
- Wrap the shorter wires halfway with green yarn and the rest with yellow yarn, secure with glue.
- Attach the crochet petals to the top of the long wire by threading the wire through the center gap and secure with glue.
- Arrange the flowers into a bundle, securing the bases together with green yarn wrapped around the wires. Use a dab of glue to hold everything in place.
- Once dry, arrange your flowers as desired. Trim the long wire to the desired stem length for your bouquet.
Complete the look by fluffing out the petals and bending the wires to mimic the natural arch of orchid flowers. Your crochet orchid is now ready to display!
Crochet Orchid Flower Free Pattern
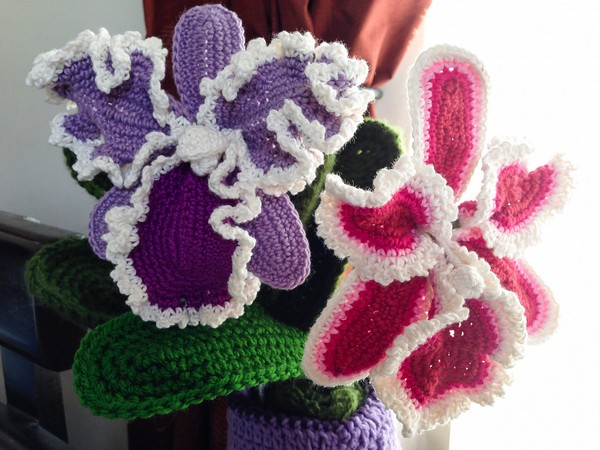
These crocheted orchard flowers are a fun and easy project to make. You can use these orchard flowers to make a bouquet, brooch, centerpiece, or jewelry.
Skill Level: Intermediate
Terms: US
Finished Size
- Height: 13 inches
- Circumference: 6.5 inches (distance between the longest tip of the petals)
Materials Required
- Balinese cotton yarn or substitute with mercerized crochet cotton thread size 5 in various colors. Colors used in this pattern include cream, purple, lilac, red, fuchsia, and pink.
- ICE yarn 100% acrylic in dark green.
- Craft wire in 22, 24, and 26 gauge.
- Floral stem wrapping tape (0.5 in in diameter).
- Hooks: C/2.75mm and 3.75mm
Gauge
- Balinese cotton: 7 sc = 1 inch
- ICE yarn: 4 sc = 1 inch (when two strands are crocheted together)
All stitches are worked in the round.
Preparing the Wire
Cut the wires as follows:
- Anther and its cap: 26-gauge, 7 inches: 2 pieces
- Petals and sepals: 24-gauge, 7 inches: 6 pieces
- Leafs: 22-gauge, 22 inches: 4 pieces
Safety Notice: Use safety glasses when cutting the wires.
Crochet Pattern: Floral Elements
Stitches Used:
- ch = chain
- sc = Single Crochet
- sl st = Slip Stitch
- 2 sc in 1 = 2 single crochet in one stitch (increase)
- sc2tog = single crochet 2 stitches together (decrease)
- PM = Place Marker (I use a small piece of yarn in a different color)
Anther:
- Material: Use cream color yarn and leave a 6 inches tail. Start with making 2 chains (ch).
- R1: 8sc into the 2nd ch from hook, join with sl st. 1ch.
- R2: 1c in the same ch-1 space (sp), 1sc in each stitch (st) around, join with sl st, 1ch.
- R3: (sc2tog) 4 times, sl st to the first sc, fasten off yarn.
Anther Cap:
- Material: Use cream color yarn and leave a 6 inches tail. Chain 5.
- R1: Hold the 26-gauge wire between the hook and the yarn, yarn over (yo) and pull up a loop over the wire, tighten to secure the wire in place, sc in the 2nd ch from hook, sc in each of the next 3 stitches, 3sc in the next stitch. Do not turn. Position the center of the wire at the last sc you just made, bend the wire gently toward the other end; sc in each of the next 3st, pinch and hold both wires and position it above the yarn, sl st to the first sc, 1ch.
- R2: 1sc in the same ch-1 space, 1sc in each of the next 4 stitches, (2sc in 1 stitch) 2 times, sc in each of the next 4 stitches, join with sl st to the first sc, 1ch.
- R3: 1sc in the same ch-1 space, sc in each of the next stitches around, join with sl st to the first sc, 1ch, fasten off.
Sepals (make 3):
- Material: Use purple yarn and leave a 6 inches tail. Chain 15.
- R1: 1sc in the 2nd ch from hook, sc in each of the next 12 stitches, 3sc in the next stitch. Carry the tail inside the stitches, 12sc, 2sc in the last stitch, joins with sl st to the first sc.
- R2 to R4: Procedures include holding 22-gauge wire, placing markers (PM), sc in specified stitches along with increases and gently bending the wire to fit the perimeter of the stitches, concluding with securing the wire and cutting the yarn.
Side Petals (make 2):
- Material: Use purple yarn and leave a 6 inches tail. Chain 15.
- R1: 1sc in the 2nd ch from hook, sc in each of the next 12 stitches, 3sc in the next stitch. Carry the tail inside the stitches, 12sc, 2sc in the last stitch, joins with sl st to the first sc.
- R2: Procedures include holding 22-gauge wire, placing markers (PM), sc in specified stitches along with increases, and gently bending the wire to fit the perimeter of the stitches.
Center Petals Creation
- Starting with Lilac Yarn:
Leaving a 6-inch tail, chain 13.
R1: 1sc in 2nd ch from hook, 10sc, 3sc in next st. Carry the tail inside the stitches, sc in each of the next 11 st.—25sc.
R2: Hold the 24-gauge wire between the hook and the yarn, sc in same joining sp, PM, 11sc, position the center of the wire at the corner st, bend the wire gently toward the other end, (2sc in 1) 2 times, 12sc, pinch and hold both wires and position the wire above the yarn, join with sl st to first sc—28sc
R3 - R8: (Progress through rounds, increasing stitches as described. R8 ends with fastening off the yarn.)
Leafs Crafting
- Using ICE Yarn Dark Green:
Crochet double strands and leaving a 6-inch tail, chain 15.
R7 - R10: (Continue through rounds, increasing stitches and incorporating the wire as detailed. R10 concludes with securing the yarn to the wire.)
Final Assembly
- Prepare Leafs and Petals:
Cut 15 inches of thread, fold in half and connect it to the center bottom part of the leaf. Pull the thread gently toward the wire. Using flower tape, wrap around the wire and threads to the end of the wires. Repeat for the rest of the leafs and petals, excluding the center petal, anther, and cap. - Anther and Cap Assembly:
Cut 10 inches of wire, fold it in half. Insert the wire into the center of the anther and pull it down gently, passing through some of the stitches at the bottom part. Put together the anther and its cap, then wrap with flower tape. - Join Center Petal and Anther:
Pick up the center petal with the right side facing up and place the anther facing down toward the petal. Hold together and wrap with flower tape. - Combine Flower Elements:
Gather together all the flower elements. Using 26 gauge wire, wrap around the neck of the flower several times to secure them together (do not cut the wire). Attach a leaf at about 4 inches from the neck of the flower. Attach the remaining leaves about 1 inch apart, finish the wire wrapping. Using flower tape, wrap around the stem starting from the neck of the flower all the way to the end of the stem. - Display:
Arrange the flower in a vase (Note: Vase pattern not included).
These detailed steps help in creating a crocheted flower, starting with crafting the center petals, creating the leaves, and then assembling all components into a beautiful floral display.
How To Crochet Coleus Plant
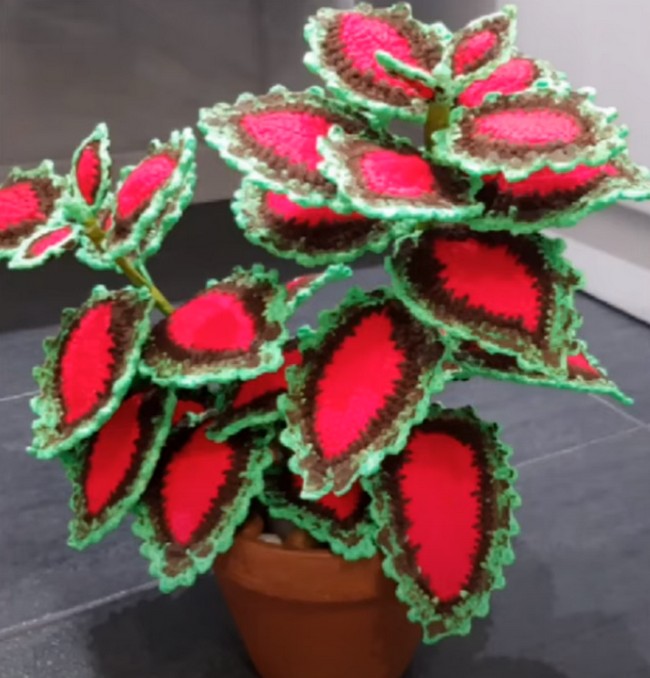
Crochet this easy Coleus Plant as a wonderful accessory for your home décor. The best part about it is that it's made out of yarn so that you can use it as a decorative item and a decoration in your house during the different seasons.
Materials Needed
- Woollen Yarn
- Crochet Needles
- Glue Gun
- Wire
- Black crayon
Abbreviations
- Sl st: slip stitch
- Sc: single crochet
- Hdc: half double crochet
- Dc: double crochet
- Tc: triple crochet
- Ch: chain
Pattern
Leaf A
- Ch15
- Sc, 3hdc, 2dc, (2dc), 2dc, (2dc), 3hdc, sc, ch1
- Sc, 3hdc, 2dc, (2dc), 2dc, (2dc), 3hdc, sc, sl st with 1st st
- 3hdc, 3dc, (2dc), 3dc, (2dc), 3hdc, sc, sc, (sc, ch3, back loop sc)
- Sc, sc, 3hdc, (2dc), 3dc, (2dc), 3dc, 3hdc, sl st with 1st st
- Hdc, (2dc), (2tc), (2tc), 11dc, 2hdc, 2sc, (sc, ch3, back loop sc)
- 2sc, 2hdc, 11dc, (2tc), (2tc), (2dc), hdc, sl st with 1st st
- Sc in each st, (in the middle sc, ch3, back loop sc), again sc in each st, sl st with 1st st
- (Sc, ch3, back loop sc, sl st) repeat until middle, (sc, ch3, back loop sc)*3, again repeat the 1st pattern
Leaf B
- 13ch
- Sc, 3hdc, 2dc, (2dc), 2dc, 2hdc, sc, ch1
- Sc, 2hdc, 2dc, (2dc), 2dc, 3hdc, sc, sl st with 1st st
- 3hdc, 2dc, (2dc), 2dc, (2dc), 2hdc, sc, sc, (sc, ch3, back loop sc)
- Sc, sc, 2hdc, (2dc), 2dc, (2dc), 2dc, 3hdc, sl st with 1st st
- Hdc, (2dc), (2tc), (2tc), 8dc, 2hdc, 2sc, (sc, ch3, back loop sc)
- 2sc, 2hdc, 8dc, (2tc), (2tc), (2dc), hdc, sl st with 1st st
- Sc in each st, (in the middle sc, ch3, back loop sc), again sc in each st, sl st with 1st st
- (Sc, ch3, back loop sc, sl st) repeat until middle, (sc, ch3, back loop sc)*3, again repeat the 1st pattern
For Leaf C
- 9ch
- Sc, 2hdc, dc, (2dc), dc, hdc, sc, ch1
- Sc, hdc, dc, (2dc), dc, 2hdc, sc, sl st with 1st st
- 2hdc, dc, (2dc), dc, 2hdc, sc, sc, (sc, ch3, back loop sc)
- Sc, sc, 2hdc, dc, (2dc), dc, 2hdc, sl st with 1st st
- Hdc, (2dc), (2tc), (2tc), 3dc, 2hdc, 2sc, (sc, ch3, back loop sc)
- 2sc, 2hdc, 3dc, (2tc), (2tc), (2dc), hdc, sl st with 1st st
- Sc in each st, (in the middle sc, ch3, back loop sc), again sc in each st, sl st with 1st st
- (Sc, ch3, back loop sc, sl st) repeat until middle, (sc, ch3, back loop sc)*3, again repeat the 1st pattern
Leaf D
- Ch6
- 2sc, hdc, 2sc, ch1
- 2sc, hdc, 2sc, sl st with 1st st
- 2sc, hdc, 2sc, (ch3, back loop sc), 2sc, hdc, 2sc, sl st with 1st st
- (Sc, sl st) repeat, (in the middle sc, ch3, back loop sc)
Note: Parentheses indicate stitches to be worked in the same stitch or space.
Crochet Orchid Petals
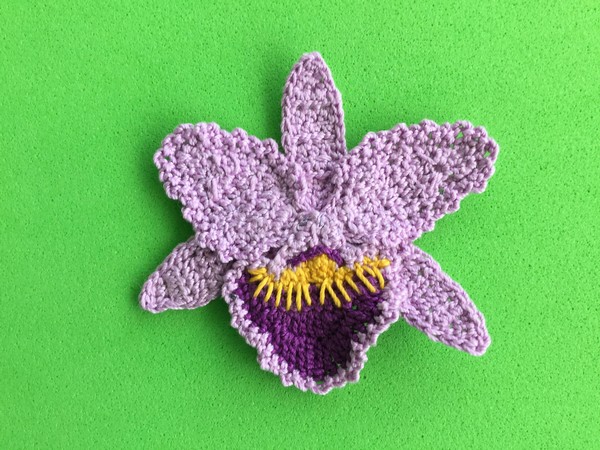
This orchid flower is easy to make, versatile, and looks beautiful in any room. Perfect for those who love plants and crafting, this pattern will guide you through creating a stunning orchid appliqué that you can adorn onto various items or use as a decorative piece. The pattern is designed to be accessible for crocheters of different skill levels and includes detailed instructions for making orchids in three sizes. Whether you're looking to add a floral touch to your accessories, home decor, or simply wish to craft a heartfelt gift, this pattern offers endless possibilities.
Materials Used
- Crochet cotton or wool (Scheepjes Maxi Sugar Rush 2 ply in Orchid (226), Ultraviolet (282), and Yellow Gold (208))
- Crochet hook (1mm hook recommended)
- Scissors
- Darning needle (for weaving in ends)
- Sewing thread and needle (for stitching the orchid pieces together)
Abbreviations
- st - stitch
- sts - stitches
- ch - chain
- sl st - slip stitch
- sc - single crochet
- hdc - half double crochet
- dc - double crochet
- tr - treble crochet
- dtr - double treble crochet
Making Process of the Crochet Orchid Pattern
Large Petal
- Start with Orchid (226) color and make a magic loop.
- Row 1: Chain 7, slip stitch in the 2nd chain from the hook, 1 single crochet in next stitch, 2 half double crochets in each of the next two stitches, 1 half double crochet in the next stitch, slip stitch in the circle. Repeat the 7 chain pattern on the other side and join parts by slip stitching through the last 2 stitches of each side. Fasten off.
- Attach Yellow Gold (208) for the next steps.
Row 2:
- Chain 1, 1 single crochet in the same stitch as the chain. Continue with single crochet, slip stitch, half double crochets, a joined treble crochet over the next 3 stitches following the pattern, end with single crochets in the last 2 stitches. Fasten off.
Row 3 and beyond:
- Switch to Ultraviolet (282), continue with 1 chain, single crochets across to the end. Turn and follow the pattern's instructions for subsequent rows to shape the petal, using stitches like slip stitch, double crochet, treble crochet, and double treble crochet across different rows for detailing and finishing.
Small Petals (Make 3) and Side Petals (Make 2):
- Begin with a magic loop using Orchid (226).
- Follow a similar process as large petals, with a simpler pattern for small petals and a slight variation for side petals, involving chains, half double crochets, double crochets, and slip stitches across different rows to shape each petal.
To Make Up:
- Weave in all ends.
- Optionally, embroider yellow markings on the large petal and purple around the yellow's end for added detail.
- Stitch the 2 side petals behind the large petal and attach the 3 small petals behind those to complete your orchid applique.
Enjoy crafting your orchid applique! You can adjust the sizes by changing yarn types and hook sizes, offering the flexibility to create orchids perfect for any project or decor.
Leave a comment